How to become a Full Stack Developer


Who is a Full Stack Developer?

A developer who is comfortable in developing both the back end and the front end. That is someone who knows how to deal with databases, PHP, HTML, CSS, JavaScript and everything in between.

Breaking the technology stacks

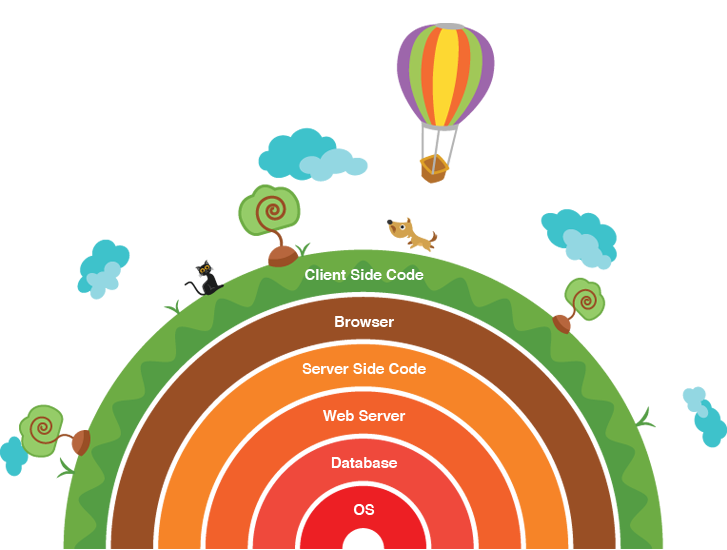
As shown in the figure, there are many technology stacks. The things inside those technology stacks are as follows.

System Administration

1.       Linux and basic shell scripting
2.       Cloud computing: Amazon, Rackspace, etc.
3.       Background processing: Gearman, Redis
4.       Search: Elasticsearch, Sphinx, Solr
5.       Caching: Varnish, Memcached, APC / OpCache
6.       Monitoring: Nagios

Web development tools

1.       Version control: Git, Mercurial, SVN
2.       Virtualization: VirtualBox, Vagrant, Docker

Back end tech

1.       Web servers: Apache, Nginx
2.       Programming language: PHP, NodeJS, Ruby
3.       Database: MySQL, MongoDB, Cassandra, Redis, SQL / JSON in general

Front-end tech

1.      HTML / HTML5: Semantic web
2.       CSS / CSS3: LESS, SASS, Media Queries
3.       JavaScript: jQuery, AngularJS, Knockout, etc.
4.       Compatibility quirks across browsers
5.       Responsive design
6.       AJAX, JSON, XML, WebSocket

Design

1.      Converting website design into front-end code
2.       UI
3.       UX

Mobile

1.       iOS
2.       Android
3.       Windows mobile
4.       Hybrid: PhoneGap, Appcelerator

The unicorn


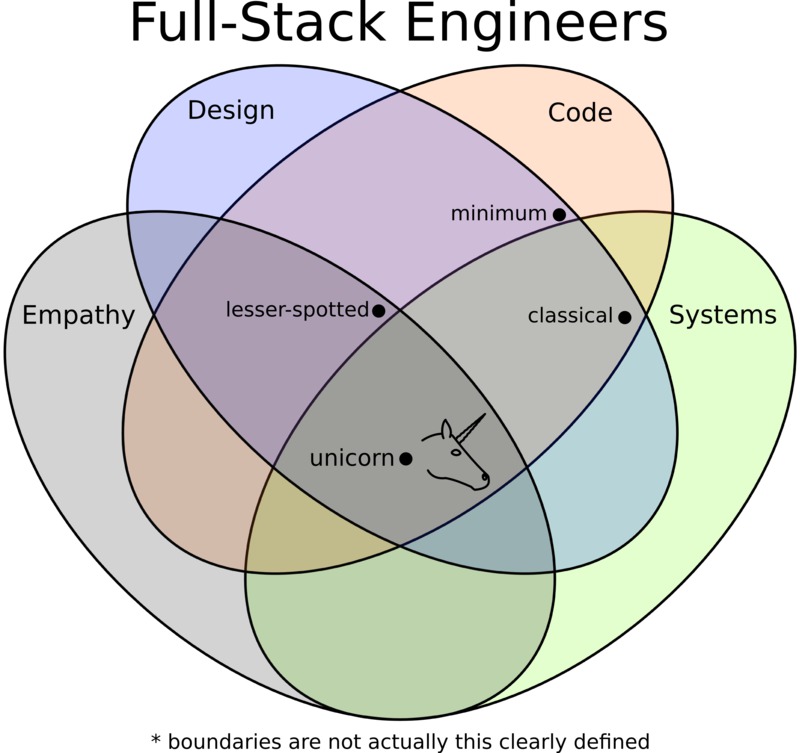
To be a full stack developer you should have empathy in you. That is you have to be able to see in some other person’s view. You need to have creativity and ability to plan. So that you have the design skills. Obviously you have to code. That includes building the software, version controlling, testing etc. apart from those systems knowledge should be there for storing, accessing and transferring data.
All these disciplines make you a successful full stack developer; a unicorn!

Be a full stack developer or not?

For a full stack developer, it is not needed to specialize one thing. That is not possible as he/she is an all-rounder. But should be comfortable with all the technologies to work with. To be comfortable in every technology is also kind of being an expert.

Kashumi Madampe
CIS 2010/2011
kashumi91@gmail.com


1 comments :

iOS Development Beginner Tutorial 3 - Working With Storyboard

In this iOS Development Tutorial let's go deep into the Storyboard concept that Apple introduced few years ago.
Let's create a new project & here you can see the default Storyboard screen.


You can change the default Storyboard to your custom created Storyboard in Project Settings --> General Tab --> Main Interface


If you are going to create an App with only Single screen you can use this default screen as your single screen. But most of the times you will end up with so many screens in the app. To Navigate through those screens iOS Apps have 2 default ways. They are,


  • Navigation Controller
  • Tab Bar Controller
Here is an example of Navigation Controller in iOS.
 
 
 Here is an example of Tab Bar Controller in iOS.


Now you have an idea of what are those Controllers. Let's implement Navigation Controller first in our sample App.
Select the ViewContoller View you want to add Navigation Controller & then go to Editor in the Menu bar & select Embed In.  Now you can see both Navigation Controller & Tab Bar Controller. Select Navigation Controller from there.


Now you can see Xcode automatically creates the Navigation Controller for you.
To Show you how Navigation Controller works, I'm going to add a new ViewController to the StoryBoard. You can easily add a ViewController by drag & drop a new ViewController from here.


And then I'm going to change both ViewController Background colours.


Then I'm going to add a Button to the 1st ViewController & when I touch that Button I want to navigate to the 2nd ViewController.
 
 
To setup the navigation Press Control on the keyboard & drag the Button to 2nd ViewController. Now you can see a dialog box as follow.
  
In that dialog box select Show. Now you have completed the Navigation controller combination with Storyboard. Here is how it works in the Simulator. 
 
It automatically creates thousands of codes & you just need to put a button to create the navigation. 
Tab Bar also works as same. Let's add a Tab Bar Controller to 2nd ViewContoller. After adding it, the storyboard will look like this.


Let's add 2 more ViewControllers to the storyboard & Now I'm going to add those 2 new ViewControllers to the TabBar Controller. 
 
 
To add new ViewControllers to the TabBar Controller press Control button on the keyboard & drag TabBarController to a new ViewController.
  
In that dialog box select View Controllers. Do the same steps to the next ViewController as well. Now you can see it automatically creates all the connections related to Tab Bar Controller.
 
 
To see this, let's run the project in a simulator. Here you can see, when you navigate to the 2nd ViewController there is a Tab Bar inside the View & you can switch between Views using the Tab Bar.
  
This is how the Navigation Controller & Tab Bar Controller works in Storyboard. If you are not using Storyboard & keen to use XIB, there is a programmatically way of implementing those 2 Controllers as well. I'll discuss about them later in this tutorial series.
 
Dilum BC Navanjana
[CIS 2010/2011]
Associate Software Engineer(iOS), 
Creation Application
dilum@creationapplication.com 


2 comments :